Ever wondered how to remodel a bathroom and make it truly yours? You’re not alone.
- In 2026, 29% of homeowners plan to dive into Bathroom Remodelling.
- Many want fresh looks, better function, smart tech, or spaces that fit new routines.
Let’s get you ready to join them with confidence!
Key Takeaways
- Start with a solid plan. Decide on your bathroom layout and functionality to avoid costly mistakes later.
- Set a realistic budget and timeline. This helps prevent surprises and keeps your project on track.
- Always obtain necessary permits. Skipping this step can lead to fines and impact your home’s value.
Planning Your Bathroom Remodel
Decide on Layout and Functionality
Thinking about how to remodel a bathroom starts with the layout. Do you want to keep things where they are, or move fixtures around? Changing the layout can make your bathroom feel brand new, but it often means higher costs and a longer timeline because plumbing and electrical work gets more complicated.
Here are some things to consider:
- Wall-mounted toilets or floating vanities can open up small spaces.
- Make sure you have enough storage for towels, toiletries, and toilet paper.
- The flow of the room should match your style and daily routine.
If you skip this step, you might regret it later. Planning the layout sets the stage for everything else.
Set Budget and Timeline
Budgeting is a big part of bathroom remodeling. Costs in 2026 vary a lot. Small bathrooms usually cost $110 to $280 per square foot. Master bathrooms range from $12,000 to $35,000, while luxury projects can go over $95,000. Most people spend between $6,600 and $17,600.
Timelines depend on your choices. Here’s a quick look:
| Phase | Duration |
|---|---|
| Planning & Design | 1-2 weeks |
| Demolition | 2-4 days |
| Rough-In Work | 3-5 days |
| Installation | 1-2 weeks |
Setting a realistic budget and timeline helps you avoid surprises. Underestimating either is a common mistake.
Permits and Preparation
Permits are a must for most bathroom remodeling projects. You’ll need them for plumbing and electrical changes. Skipping permits can lead to stop-work orders, fines, and even safety hazards.
Here’s what you need to know:
| Aspect of Remodeling | Permit Required? |
|---|---|
| Plumbing changes | Yes |
| Electrical changes | Yes |
| Minor plumbing | No |
| Minor electrical | Yes |
Not getting permits can hurt your home’s value and make selling harder. Always check local rules before you remodel a bathroom.
Step by Step Bathroom Remodeling Process
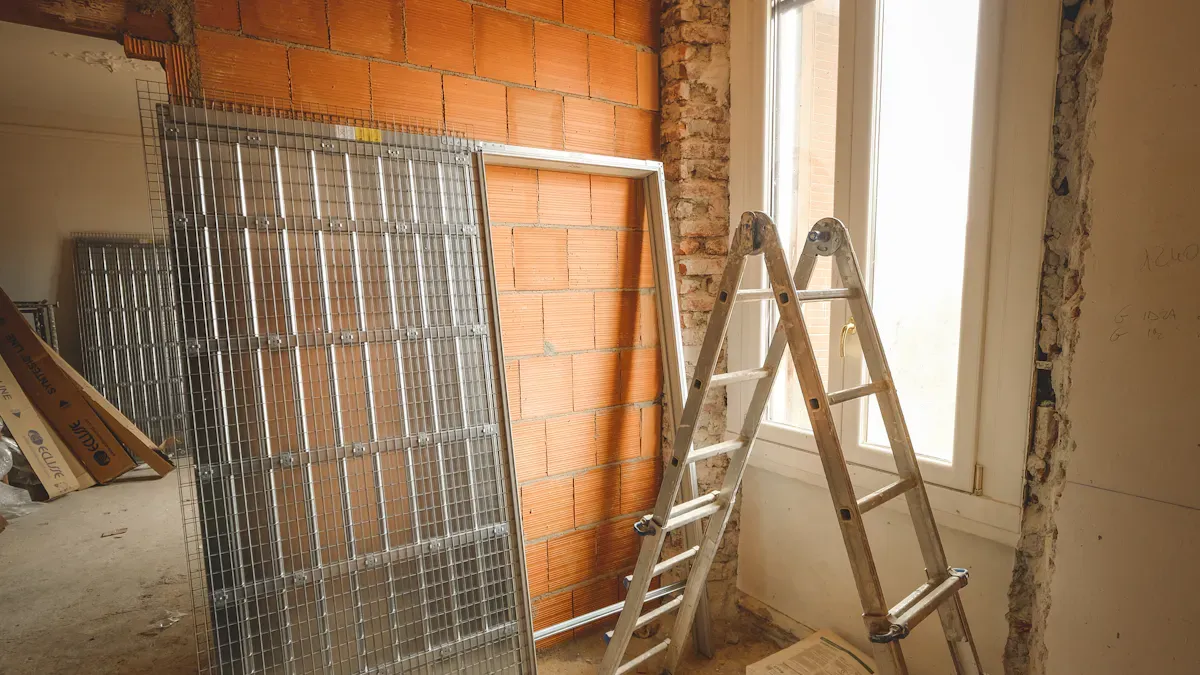
Step 1: Demolition and Disposal
Ready to kick off your bathroom remodeling? Demolition is the first step. This phase clears out old fixtures, tiles, and cabinets so you can start fresh. Safety comes first.
- Seal off the bathroom with plastic sheeting or painter’s tape. This keeps dust from spreading to other rooms.
- Protect nearby furniture with tarps or sheets.
- Wear safety goggles, a quality face mask, sturdy gloves, and steel-toed boots.
- Turn off the main water line and electricity before you begin.
- Remove all furniture and items from the bathroom.
- Make sure you have all necessary permits.
Tip: Check your power tools. Make sure safety switches are engaged when not in use.
Disposal matters, too. Sort materials for recycling and proper disposal. Separate metals like copper and brass. Handle porcelain fixtures carefully for ceramic recycling. Remove hazardous materials before tossing anything. Clean and store recyclable parts. Research local recycling centers and scrap metal buyers. Proper disposal reduces landfill waste and can even earn you a refund on valuable metals.
Step 2: Plumbing and Electrical Updates
After demolition, it’s time for plumbing and electrical work. This step is crucial for how to remodel a bathroom safely and efficiently.
- Update old pipes, especially galvanized or cast-iron ones. This prevents leaks and improves water flow.
- Install proper drainage with a minimum slope of 1/8 inch per foot.
- Add vent stacks and P-traps for each fixture. These keep sewer gases out and water flowing smoothly.
- Rough-in plumbing must pass inspection before closing walls.
- Install exhaust fans to vent air outside and prevent mold.
Electrical updates follow strict codes in 2026.
| Requirement | Description |
|---|---|
| GFCI Protection | Class A Ground Fault Circuit Interrupter protection is required for all 125V to 250V receptacles in specified locations. |
| Locations | Bathrooms, garages, kitchens, laundry areas, indoor damp/wet locations, and more. |
| Circuit Wire | 16 AWG copper or 14 AWG aluminum/CCA for branch circuits. Lighting and exhaust fans only; no receptacles allowed. |
Note: Always check local codes and hire a licensed professional if you’re unsure.
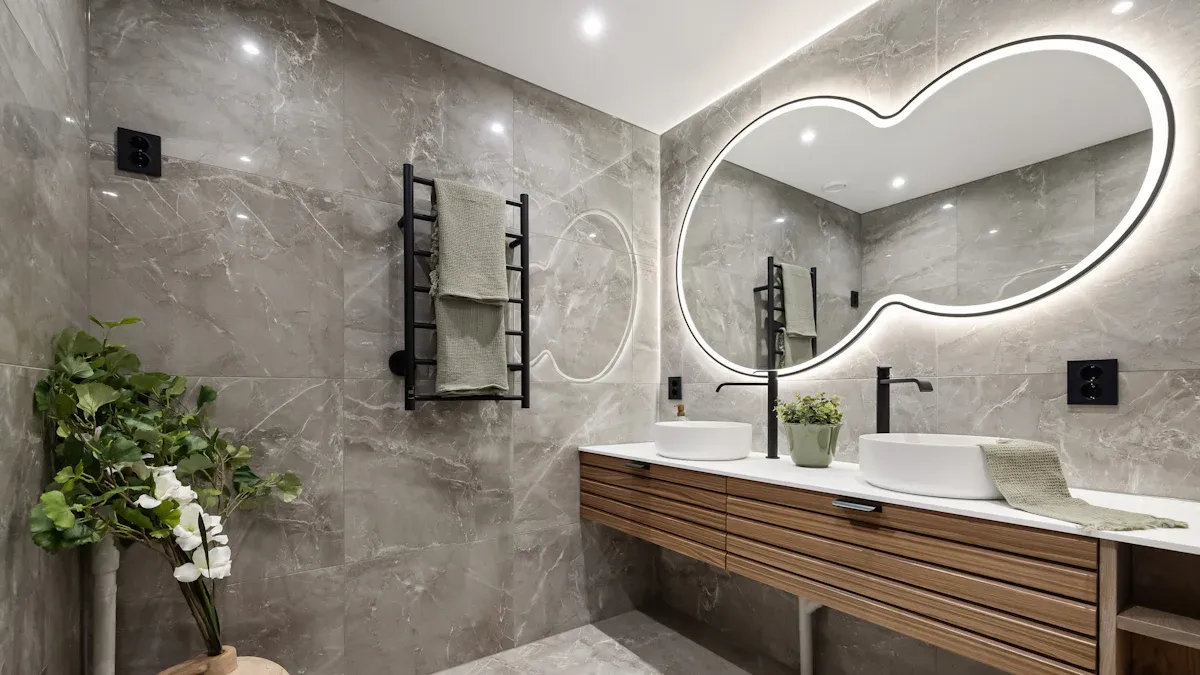
Step 3: Choosing Materials and Fixtures
Choosing materials and fixtures shapes the look and durability of your bathroom remodeling.
- Oversized and sculptural light fixtures add visual weight and a curated feel.
- Vintage-inspired tiles bring nostalgia with hand-painted and artisanal styles.
- Microcement finishes offer a seamless, modern look.
- Smart, sustainable technologies like LED mirrors and water-saving taps boost energy efficiency.
Material choices matter for maintenance and longevity.
- Porcelain and ceramic tile: Water-resistant, low-maintenance, endless colors and patterns.
- Luxury vinyl flooring: Budget-friendly, waterproof, mimics wood or stone.
- Natural stone: High-end look, needs sealing to prevent water damage.
- Engineered wood: Moisture-resistant, warm appearance.
Countertops and wall panels also impact durability.
- Quartz: Non-porous, low maintenance, wide color range.
- Granite: Durable, needs periodic sealing.
- Marble: Luxurious, prone to staining if not sealed.
- Solid surface: Seamless, easy to clean.
Tip: Consider who uses the bathroom. For kids, pick surfaces that are durable and easy to clean. For a spa-like retreat, choose marble or quartz.
Step 4: Ventilation and Waterproofing
Proper ventilation and waterproofing prevent mold and water damage.
- Clean the fan and check ducts for airflow.
- Use timer switches to run fans for at least 20 minutes after showers.
- Install humidity sensors to activate fans automatically.
- Choose a fan with the right CFM for your room size.
- Place the fan close to the shower and seal ducts properly.
Waterproofing methods protect your investment.
| Waterproofing Method | Description |
|---|---|
| Drainage Systems and Drainage Tiles | Redirect water away from the home, seepage into foundations or basements. |
| Foundation Sealing and Exterior Coatings | Provide a barrier against water penetration. |
| Interior Waterproofing and Basement Insulation | Secure interior spaces from moisture and temperature fluctuations. |
| Sump Pumps and Vapor Barriers | Manage and reduce excessive moisture levels, especially in basements. |
| Humidity Control | Use dehumidifiers and proper ventilation to maintain low humidity levels, preventing mold growth. |
- Install exhaust fans to reduce humidity.
- Wipe down surfaces daily.
- Use mold-resistant paints and sealants.
- Fix leaky faucets and pipes quickly.
- Keep shower curtains and doors open after use.
Step 5: Flooring, Walls, and Painting
Flooring and walls set the stage for your bathroom remodeling.
| Flooring Type | Characteristics | Suitability for High-Moisture Bathrooms |
|---|---|---|
| Luxury Vinyl Plank (LVP) | 100% waterproof, comfortable underfoot, holds up well to humidity | Highly suitable |
| Ceramic & Porcelain Tile | Durable, waterproof, easy to clean | Highly suitable |
| Properly Sealed Natural Stone | Durable but requires sealing, can be slippery | Suitable with proper maintenance |
| Laminate Flooring | Water-resistant but not waterproof, can swell | Not recommended for full baths |
| Engineered Wood | Risky in high-moisture areas | Not recommended |
| Grout or Natural Stone | Vulnerable without sealant | Not recommended |
Painting techniques matter, too.
- Use paint with mold and mildew resistance.
- Prepare surfaces by cleaning and sanding.
- Repair wall damage before painting.
- Apply primer for moisture protection.
- Use thin, even coats and allow proper drying time.
Semi-gloss and satin finishes are durable and moisture-resistant. Mildew-resistant paint options help prevent mold growth. Specialized bathroom paints like Benjamin Moore Aura Bath & Spa and Zinsser Perma-White offer enhanced moisture resistance.
Tip: Bathroom-specific paints bond well and withstand high humidity.
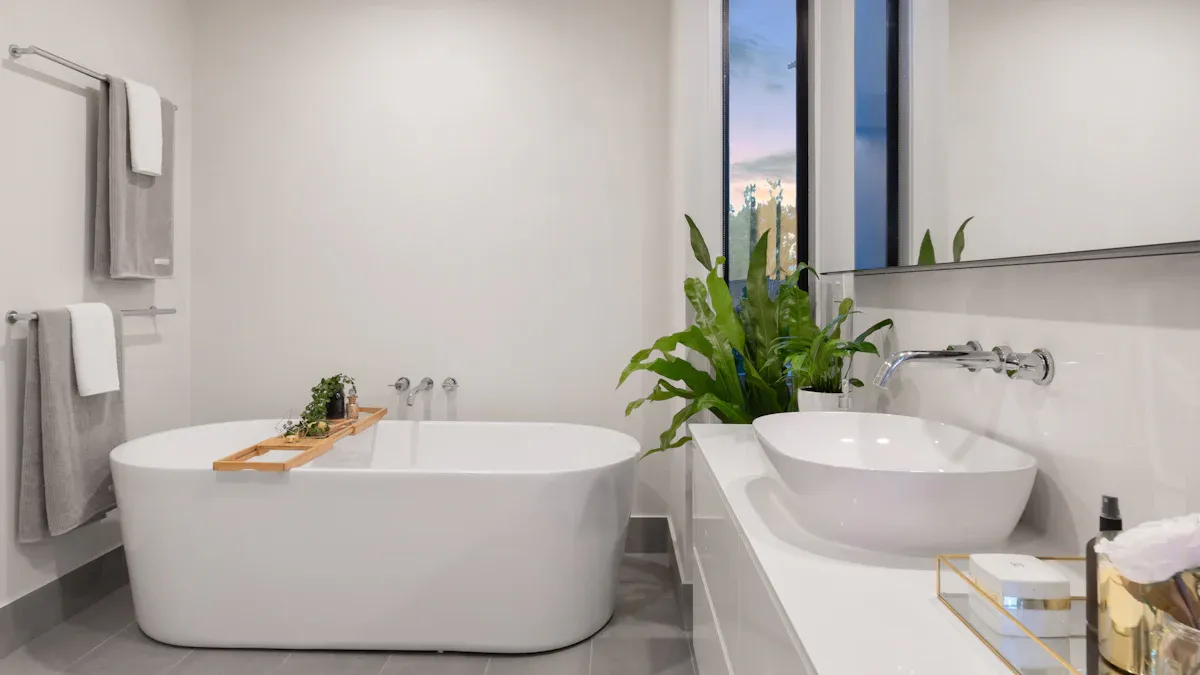
Step 6: Install Fixtures and Features
Now it’s time to install fixtures and features. This step brings your bathroom remodeling vision to life.
- Plumbing surprises can happen, especially when relocating fixtures.
- Uneven floors complicate installation.
- Shower doors must fit properly to prevent leaks.
- Dry rot may appear, revealing hidden moisture damage.
Essential tools include safety gear, basic hand tools, plumbing-specific tools, pipes, fittings, and new fixtures.
- Use a stud finder to mark secure hanging points.
- Level the installation area.
- Drill holes for drain and supply pipes.
- Install sink and faucet.
- Hook up plumbing to new fixtures.
Step 7: Final Touches and Accessories
The last step in the step by step process is adding finishing touches and accessories. These details enhance both appearance and function.
Luxury features like heated floors boost comfort. Convenient power outlets make it easy to use hairdryers and gadgets. Walk-in showers modernize the space and improve accessibility.
| Material Type | Benefits |
|---|---|
| Ceramic and Porcelain Tile | Waterproof and available in endless designs |
| Glass Panels | Modern look, easy to clean |
| Stone Slabs | Luxurious but requires maintenance |
| Acrylic and Fiberglass Panels | Affordable and low-maintenance |
| Matte Black or Brushed Gold Faucets | Modern and sophisticated |
| Wall-Mounted Vanities | Sleek, contemporary feel |
| Rainfall Showerheads | Spa-like shower experience |
| Freestanding Tubs | Statement piece in bathroom remodel |
- Pull-out laundry hampers and hooks keep the floor clear.
- Bathmats add warmth and prevent slipping.
- Moisture-friendly plants bring nature indoors.
- Stylish cabinet hardware enhances vanity design.
Accessories should match your overall design theme.
- Choose a focal point, like a freestanding tub or statement shower.
- Match towel bars and cabinet hardware to the finish of your focal point.
- Use light fixtures and mirrors as accents.
Note: Bathmats and plants that fit your style make the space feel unified. Cabinet hardware that complements plumbing fixtures adds a finishing touch.
Bathroom remodeling is a journey. Following this step by step guide helps you remodel a bathroom with confidence. Each stage builds on the last, creating a space that’s beautiful, functional, and durable.
Common Errors in Remodelling Bathroom
Remodeling a bathroom can be exciting, but it’s easy to make mistakes that cost you time, money, and peace of mind. Let’s look at the most common errors people make during bathroom remodeling and how you can steer clear of them.
- Inadequate Planning
Jumping in without a solid plan often leads to unexpected costs and delays. Take time to map out your vision and budget before you start. - Ignoring Functionality
A beautiful bathroom is great, but if it doesn’t work for your daily routine, you’ll get frustrated fast. Think about storage, layout, and how you use the space. - Overlooking Ventilation
Skipping proper ventilation can cause mold and mildew. Always install a fan that matches your bathroom size. - Choosing Inappropriate Materials
Not all materials can handle the moisture in a bathroom. Pick surfaces that are water-resistant and easy to clean. - Insufficient Storage
Forgetting about storage leads to clutter. Plan for cabinets, shelves, or built-ins to keep things tidy. - Rushing the Project
Trying to finish too quickly can result in sloppy work and missed details. Take your time for the best results.
Here’s a quick look at the financial consequences of these mistakes:
| Financial Consequence | Description |
|---|---|
| Cost overruns | Exceeding your budget due to poor planning or unexpected repairs. |
| Contractor problems | Hiring the wrong person can lead to delays and extra expenses. |
| Unforeseen issues | Surprises behind the walls can add time and cost. |
| Ignoring functionality | A pretty space that doesn’t work means wasted money. |
Tip: Avoid these pitfalls by planning carefully, choosing the right materials, and not rushing your bathroom remodeling project. If you’re unsure, consider hiring a professional for guidance.
Conclusion
You made it to the end! Now you know how to remodel a bathroom step by step. The process might seem overwhelming at first, but breaking it down makes everything easier. Whether you’re tackling bathroom remodeling yourself or working with a pro, you can create a space that fits your needs and style.
Here’s a quick recap of what you learned:
- Plan your layout and think about how you use the bathroom every day.
- Set a budget and timeline that works for you.
- Get the right permits before you start.
- Demolish old fixtures safely and dispose of materials responsibly.
- Update plumbing and electrical for safety and efficiency.
- Choose materials and fixtures that last and look great.
- Focus on ventilation and waterproofing to prevent future problems.
- Install flooring, walls, and paint with care.
- Add fixtures, features, and accessories for the finishing touch.
Don’t rush the process. Take your time and double-check each step. Mistakes can cost money and cause headaches later.
If you want extra help, try using a checklist or download resources from George Service. You’ll feel more confident and organized. Bathroom remodeling is a journey, but you can remodel a bathroom and enjoy the results for years to come.
Ready to start? Your dream bathroom is waiting. 🚿
Ready to remodel a bathroom? Careful planning boosts success and helps avoid regrets. Homeowners who follow a step-by-step guide see fewer mistakes and more satisfaction. For extra support, check out these resources:
| Resource | Description |
|---|---|
| Rebuilding Together | Local home repair services and community support. |
| Greenville County Redevelopment Authority | Financial help for repairs in Greenville County. |
| HUD Loan Programs | Federal and local home improvement loans. |
George Service has a 99% satisfaction rating—your dream bathroom is within reach!
FAQ
How long does a typical bathroom remodel take?
Most bathroom remodels take 2 to 4 weeks. Larger or more complex projects may need extra time. Planning helps avoid delays.
Do I need a permit for a small bathroom update?
You usually need a permit for plumbing or electrical work. Cosmetic changes like painting or new hardware often do not require one. Always check local rules.
What is the best way to save money on a remodel?
Reuse what you can, like cabinets or fixtures. Shop sales for materials. Do simple tasks yourself. Get multiple quotes from contractors.